WordPress 4.9.9 - F1 - G3 Document Version 2.0 Copyright © 2019 White Square Media, Inc. All Rights Reserved.
Page 1 of 38
Simplicity & Performance - build your dream store with aMiSTACX.

WordPress 4.9.9 - F1 - G3 Document Version 2.0 Copyright © 2019 White Square Media, Inc. All Rights Reserved.
Page 2 of 38
Congratulations!
And welcome to your Premium aMiSTACX F1 G3 Series - WordPress 4.9.8 + WooCommerce performance stack.
Important! As a supported managed service aMiSTACX will install and configure this AWS AMI stack for you should you not have
enough experience with AWS hosting. Please contact support@amistacx.com to schedule.
or
DIY - As this stack was designed to be as automated as possible, with the least amount of steps required to get you up and running
quickly, please follow the directions closely to ensure success.
It is best advised to get the product you purchased running per this documentation first! Then you have the option to customize your
solution to your requirements.
These instructions for our stack assume the following:
You have an Intermediate understanding of the AWS console
You have an Intermediate skill level and/or experience with a Linux stack, and an Intermediate skill level with WordPress.
You have a remote access SSH client, such as putty, and you understand how to create a ppk file from an AWS PEM file. These
credentials will allow you to connect to your new aMiSTACX instance in your AWS availability zone.
WinSCP Sudo: https://amistacx.com/winscp-sudo-access-for-ubuntu-ami-stacx/
Putty to AWS: https://amistacx.com/how-to-use-putty-to-connect-to-aws/
How to generate a PPK file: https://amistacx.com/how-to-generate-a-ppk-file-for-ssh-and-sftp/
More Info on Putty/AWS: http://docs.aws.amazon.com/AWSEC2/latest/UserGuide/putty.html

WordPress 4.9.9 - F1 - G3 Document Version 2.0 Copyright © 2019 White Square Media, Inc. All Rights Reserved.
Page 3 of 38
What’s New in v2.0
Ubuntu Security Roll-ups & Package Updates
PHP 7.3.0 [Default]
WordPress 4.9.9 Core
Fixed EC2 T3 Class Support
Tweaks for Performance
Full Change Log:
https://s3.amazonaws.com/amistacx.com/mp/stacx_change_logs/amistacx_wordpress_4.9.9_f1_g3_woo_change_log_v2.0.txt
WordPress EULA: https://s3.amazonaws.com/amistacx.com/mp/eula/amistacx_apache_wordpress_eula.txt
WordPress ® is a trademark of the WordPress Foundation.
WordPress 4.9.9 - F1 - G3 Document Version 2.0 Copyright © 2019 White Square Media, Inc. All Rights Reserved.
Page 4 of 38
I. Ubuntu 16.04.5 LTS Essentials
Core Software Versions
Ubuntu 16.04.5
Apache 2.4.37
PHP 7.0.33
PHP 7.1.24
PHP 7.2.15
PHP 7.3.2 [Default]
MySQL 5.7.25
WordPress 4.9.9
WooCommerce Plugin 3.5.3
aMiSTACX Page Speed & Redis Purge 1.0.0
phpMyadmin 4.5.4.1
Redis 3.0.6
WordPress 4.9.9 - F1 - G3 Document Version 2.0 Copyright © 2019 White Square Media, Inc. All Rights Reserved.
Page 5 of 38
II. System and Software Configurations
Ubuntu System Settings
Swap File = 1MB [Not proportional to instance size. Should you deploy a stack larger than a t-small, then it suggested you adjust
your swap file no more than 2x RAM.]
FPM/PHP Memory Allocation & Settings
FPM running under www-data:www-data [This means should you deploy a web application under /var/www/ then
it is best to utilize the www-data user/group; otherwise, you need to update the FPM pool.]
Note: Server is configured for EC2 t-micro and t-small. You may need to adjust these settings for Maximum performance.
/etc/php/7.3/fpm/pool.d/www.conf
FPM Pool is set to ondemand [This is to help Micro and Small Instances]
FPM Pool Settings for Server and Children default
pm.max_children = 42
pm.start_servers = 10
pm.min_spare_servers = 5
pm.max_spare_servers = 15
pm.max_requests = 500
Note: Should you run into memory issues, these settings may need to be adjusted. Should you be running a medium or large+ EC2
these settings should reflect the additional memory available.
WordPress 4.9.9 - F1 - G3 Document Version 2.0 Copyright © 2019 White Square Media, Inc. All Rights Reserved.
Page 6 of 38
PHP 7.x settings
/etc/php/7.3/fpm
memory_limit = 512M
upload_max_filesize = 150M
post_max_size = 151M
max_execution_time = 300
MYSQL [Non-default settings]
/etc/mysql/mysql.conf.d/mysqld.cnf
key_buffer_size = 32M
max_allowed_packet = 32M
thread_stack = 193K
wait_timeout = 300
innodb_buffer_pool_size = 256MB
/etc/systemd/system/mysql.service.d/override.conf #Open File Increase
[Service]
LimitNOFILE=65535
WordPress 4.9.9 - F1 - G3 Document Version 2.0 Copyright © 2019 White Square Media, Inc. All Rights Reserved.
Page 7 of 38
III. AWS Security Group Confirmation
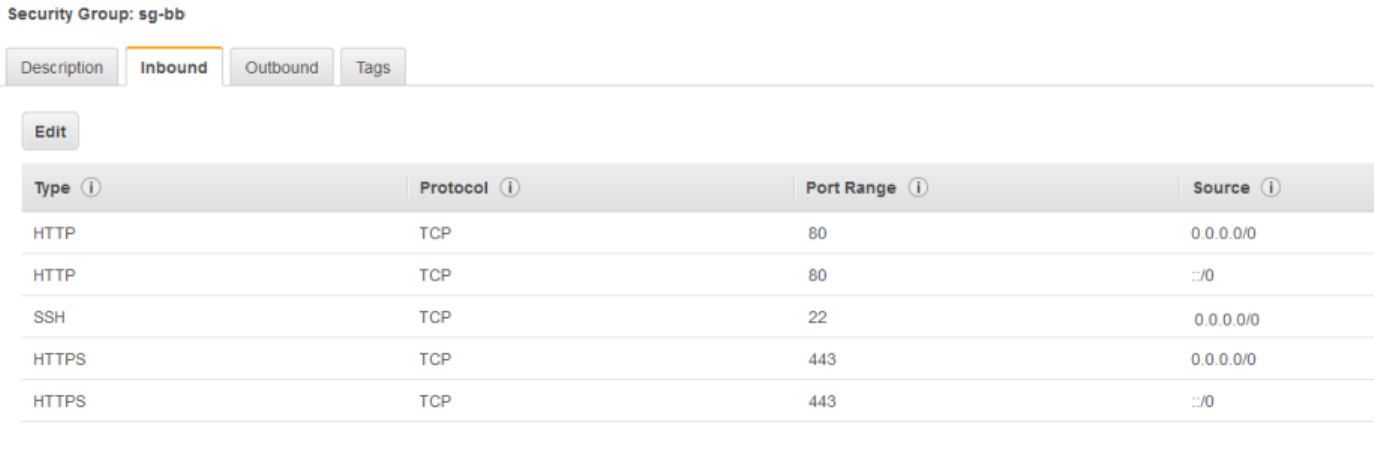
When first creating your EC2 stack, make sure your AWS security group [inbound] allows the following protocols and ports: SSH 22,
HTTP* 80, HTTPS 443 incoming, TCP 8080.
Note: It is recommended that you verify everything is working before changing the SSH to only allow specific connections.
Note: F1-LAMP server uses a secure utility port of 8080 for phpmyadmin and documentation.
WordPress 4.9.9 - F1 - G3 Document Version 2.0 Copyright © 2019 White Square Media, Inc. All Rights Reserved.
Page 8 of 38
IV. AWS Elastic IP Address [Allocation]
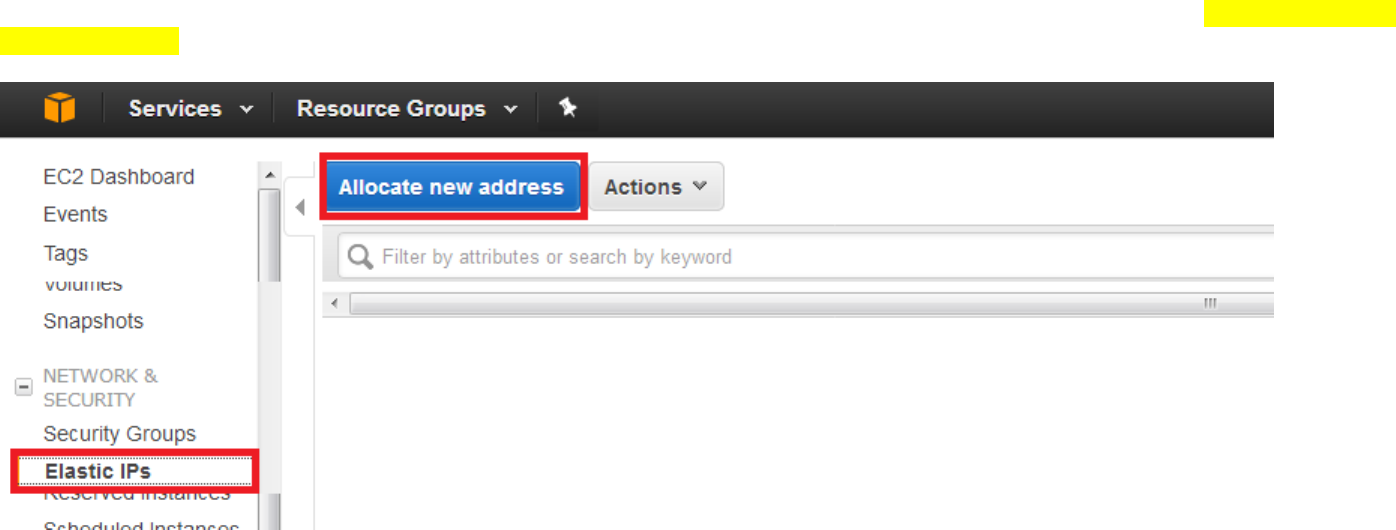
It is strongly recommended that you create an AWS elastic IP address associated to this new EC2 build instance. This will allow you
to start and stop without having to update public IP address connection information.
WordPress 4.9.9 - F1 - G3 Document Version 2.0 Copyright © 2019 White Square Media, Inc. All Rights Reserved.
Page 9 of 38
V. AWS Public IP Address [Setting]
After your image is built, first confirm you can access SSH, HTTP, and HTTPS.
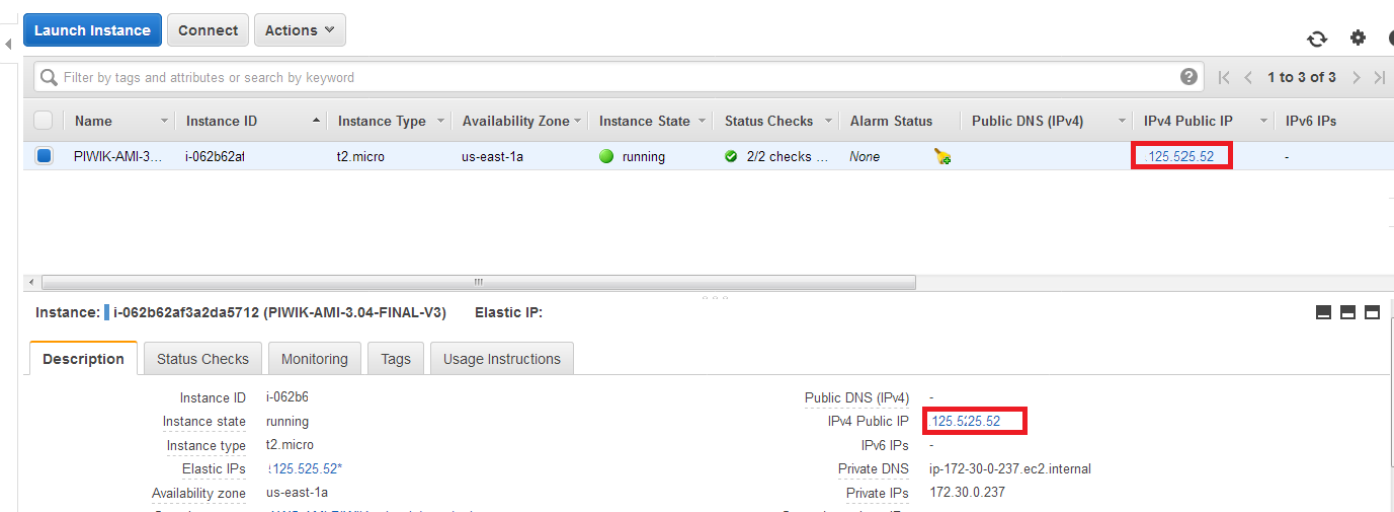
Your IP address is the elastic public IP address. You use this for DNS and for SSH.
To check HTTP: Http:<AWS_Public_IP_Address>/
To check HTTPS: Https:<AWS_Public_IP_Address>/
Note: You will need to add an exception for HTTPS as you are using a self-signed cert.

WordPress 4.9.9 - F1 - G3 Document Version 2.0 Copyright © 2019 White Square Media, Inc. All Rights Reserved.
Page 10 of 38
VI. DNS CloudFlare
CloudFlare [Easy to configure]
Our instructions use DNS/CDN provider CloudFlare for examples, and is recommended for users with basic to intermediate
Administration/Networking skills.
CF offers a great easy to use DNS service, that is very user friendly, is Free to use for basic features.
It’s a great starting point to get up and running quickly!
https://www.cloudflare.com/plans/
Note: The CloudFlare Free plan has a restriction of 100MB file uploads through their CDN. You can use CloudFlare for DNS only,
but if your require file uploads on your site from your customers that exceed 100MB, then you will have to upgrade to a paid plan.
AWS Route 53 + CloudFront [Higher skill level required to configure]
Should you want to use AWS CDN CloudFront then it is highly recommended you stick with Route 53 to handle your DNS.

WordPress 4.9.9 - F1 - G3 Document Version 2.0 Copyright © 2019 White Square Media, Inc. All Rights Reserved.
Page 11 of 38
VII. Recommended Stack Configurations [Optional - For advanced Linux Users]
Note: Should you want to use a DNS friendly name and real SSL cert, follow directions in this section; otherwise, you may proceed
with the next section.
Friendly DNS Name w/ Domain or Subdomain
[Note: It is important that you consider using a subdomain as you may want to use a free certificate(s) from Let’s Encrypt and they
do not offer wildcard certs - yet! This stack is configured to use Let’s Encrypt. For example, www is considered a subdomain, and if
you wanted to use both www and yourdomain.com you would require two certificates.]
In conjunction with external DNS, if want you to use a friendly name, you will need to access the server via SSH and use the ubuntu
user to sudo to update the following:
1A. Subdomain: [Example. www.yourdomain.com]
sudo nano /etc/apache2/sites-available/wordpress.conf
Un-comment line “remove #” and update to ServerAlias subdomain.example.com [where example.com = your domain name]
sudo nano /etc/apache2/sites-available/wordpress-ssl.conf
Un-comment line “remove #” and update to ServerAlias subdomain.example.com [where example.com = your domain
name]
Save files! And from from CLI: sudo service apache2 restart
1B. Point external A record DNS to your new subdomain > subdomain.example.com

WordPress 4.9.9 - F1 - G3 Document Version 2.0 Copyright © 2019 White Square Media, Inc. All Rights Reserved.
Page 12 of 38
2A. Domain: [Example. example.com]
sudo nano /etc/apache2/sites-available/wordpress.conf
Un-comment line “remove #” and update to ServerName example.com [where example.com = your domain name]
sudo nano /etc/apache2/sites-available/wordpress-ssl.conf
Un-comment line “remove #” and update to ServerName example.com [where example.com = your domain name]
Save files! And from from CLI: sudo service apache2 restart
<Continued>
WordPress 4.9.9 - F1 - G3 Document Version 2.0 Copyright © 2019 White Square Media, Inc. All Rights Reserved.
Page 13 of 38
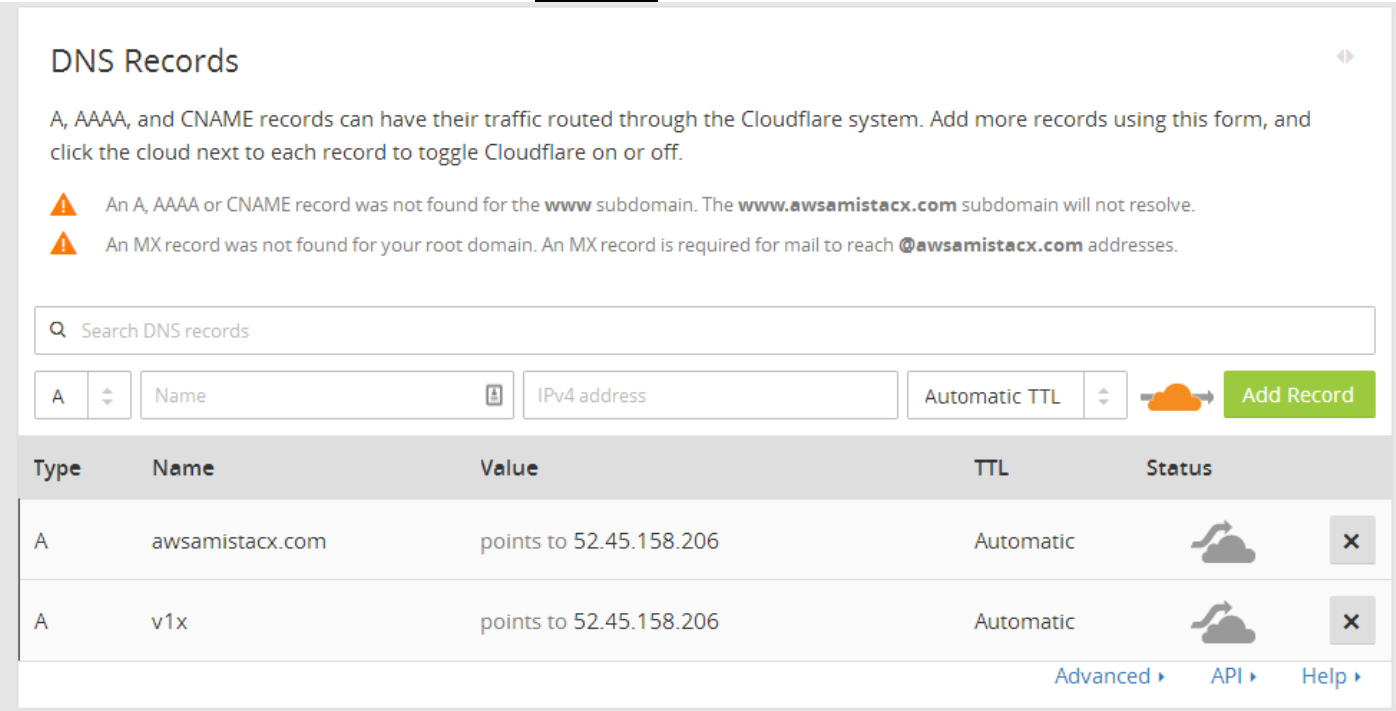
2B. Point external DNS A record to your new subdomain > subdomain.example.com
e.g.
Image: CloudFlare Panel ; Note: The grey cloud is required at this step because we still need to get the SSL certificate.

WordPress 4.9.9 - F1 - G3 Document Version 2.0 Copyright © 2019 White Square Media, Inc. All Rights Reserved.
Page 14 of 38
VIII. SSL Configuration [Optional]
A note about TLS Certificates for HTTPS. Should you run a high volume ecommerce site that can not afford any downtime, and you
are in a LAMP/LEMP configuration, then you should consider opting to purchase a certificate.
Using Let’s Encrypt for a free cert is great, but if you select to use the CloudFlare CDN, then every 90 days you will need to take your
server offline for a minute or two to renew your certificate. Certbot will not auto-renew on the CDN, and also even if you flipped the
CDN to off and renewed your certificate you still need to reload the Apache service.
Unless your server is stateless and you have multiple servers in a farm, then you will experience downtime.
CloudFlare Option A:
This product comes with a dummy SSL certificate. Should you want to utilize a free CloudFlare plan as a front-run DNS and CDN
provider - HIGHLY RECOMMENDED - then you can use their flexible SSL to map to the Dummy SSL without any additional SSL
local configurations! Or you can request a certificate from Let’s Encrypt - HIGHLY RECOMMENDED.
https://www.cloudflare.com/plans/
Sign up, add your domain, have CF host your DNS, create a subdomain or domain mapping to your AWS elastic IP address. For
Example, subdomain.example.com or example.com
Note: This Stack is CloudFlare Aware! You do not need to make any modification to see visitors IP addresses should you use this
stack for Matomo Analytics.

WordPress 4.9.9 - F1 - G3 Document Version 2.0 Copyright © 2019 White Square Media, Inc. All Rights Reserved.
Page 15 of 38
Option B. Full Paid Certificate
An alternative to Let’s Encrypt Free Certificates is to use a purchased certificate. The advantages of a purchased certificate from a
provider such as Comodo or Verisign are many.
With Let’s Encrypt, you have to take your server offline for a minute every 90 days as the certs come up for renewal. The reason is if
your server is on a CDN [it should be] then the standardized renewal cron request process will fail. Additionally, even if the server
was able to renew the request, the Apache service would still need to be restarted. [Not ideal in any e-commerce solution.]
So here we will cover just a very basic certificate installation process on Apache. There are thousands of articles covering this
process in depth, so here we seek brevity.
Please see our site for the full procedure.
https://amistacx.com/ubuntu-16-04-apache-2-4-generate-certificate-signing-request/
WordPress 4.9.9 - F1 - G3 Document Version 2.0 Copyright © 2019 White Square Media, Inc. All Rights Reserved.
Page 16 of 38
Let’s Encrypt Option C:
Note: Before you begin - DNS must resolve! In other words, http://subdomain.example.com or http://example.com must resolve
correctly to your AWS elastic public IP address. Let’s Encrypt requires this otherwise the process will fail.
After confirming the DNS, to get your free certificate from let’s encrypt - CLI:
sudo certbot-auto --apache -d example.com
Or
sudo certbot-auto --apache -d subdomain.example.com
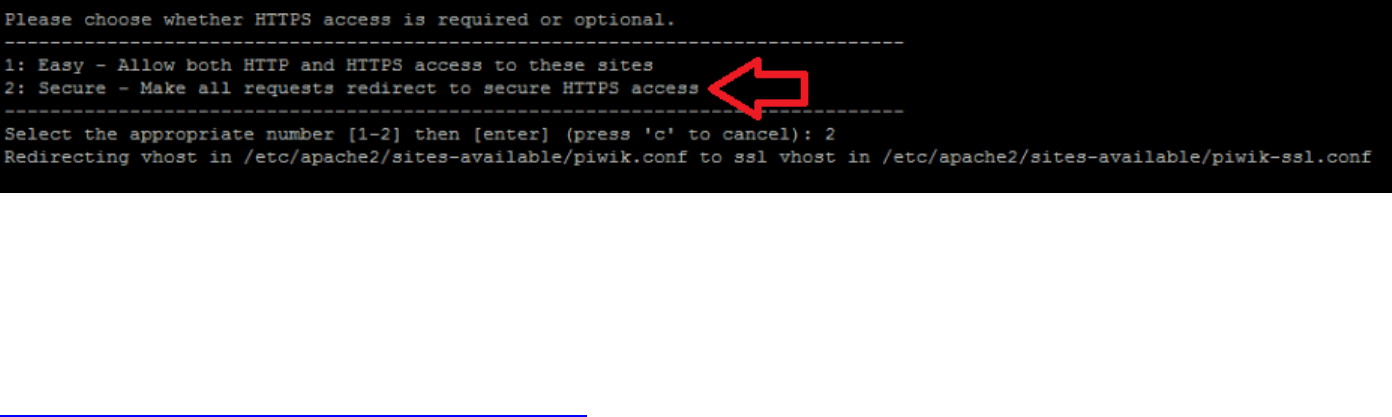
Select Option 2. Make all requests redirect to HTTPS
Note: The cert expires every 90 days, you will need to set up a cron job to renew.
Note: Troubleshooting CloudFlare TLS HandShake Error:
Should you get a TLS handshake error, please review this article.
https://amistacx.com/lets-encrypt-tls-handshake-failure/

WordPress 4.9.9 - F1 - G3 Document Version 2.0 Copyright © 2019 White Square Media, Inc. All Rights Reserved.
Page 17 of 38
D. Let’s Encrypt “*” Wildcard Certs:
Let’s Encrypt as of January 2018 offers wildcard certs. Our stacks are compatible; however, there is some DNS legwork that must be
performed. Please see the how to article on our site:
https://amistacx.com/lets-encrypt-wildcard-certs-on-ubuntu-16-04/
WordPress 4.9.9 - F1 - G3 Document Version 2.0 Copyright © 2019 White Square Media, Inc. All Rights Reserved.
Page 18 of 38
E. Cron Setup [Required for Let’s Encrypt]
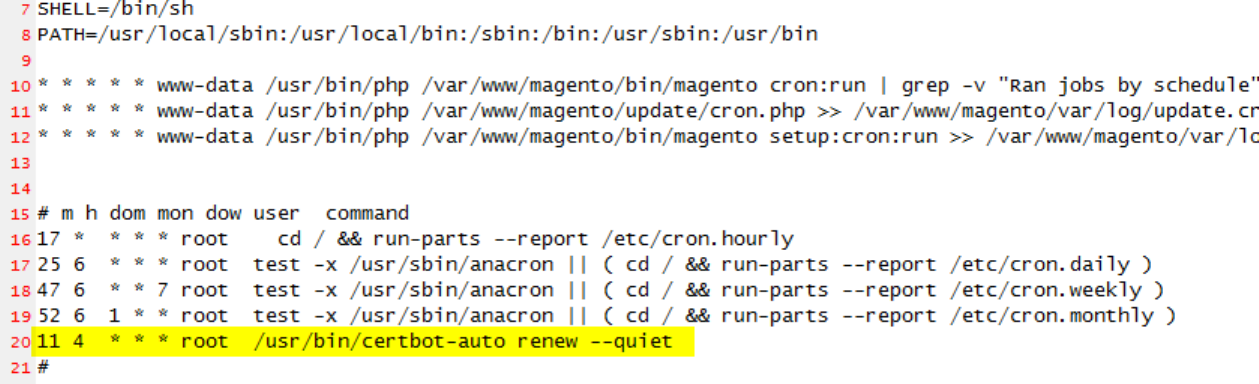
To run the renewal cert check daily, we will use cron, a standard system service for running periodic jobs. We tell cron what to do by
opening and editing a file called a crontab.
sudo nano /etc/crontab -e
Your text editor will open the default crontab which is a text file. Paste in the following line at the end of the file [as shown], then save
and close it, and reload:
11 4 * * * root /usr/bin/certbot-auto renew --quiet
sudo /etc/init.d/cron reload
The 11 4 * * * part of this line means "run the following command at 4:11 am, every day". You may choose any time.
The renew command for certbot-auto will check all certificates installed on the system and update any that are set to expire in less
than thirty days. --quiet tells Certbot not to output information nor wait for user input.
Note: Make sure outbound HTTP is open as the cron will poll the remote cert source via the cron job. This is normally the default
from the AWS security group. Allowing ALL.
WordPress 4.9.9 - F1 - G3 Document Version 2.0 Copyright © 2019 White Square Media, Inc. All Rights Reserved.
Page 19 of 38
IX. MySQL 5.7 Connection information
Login = root
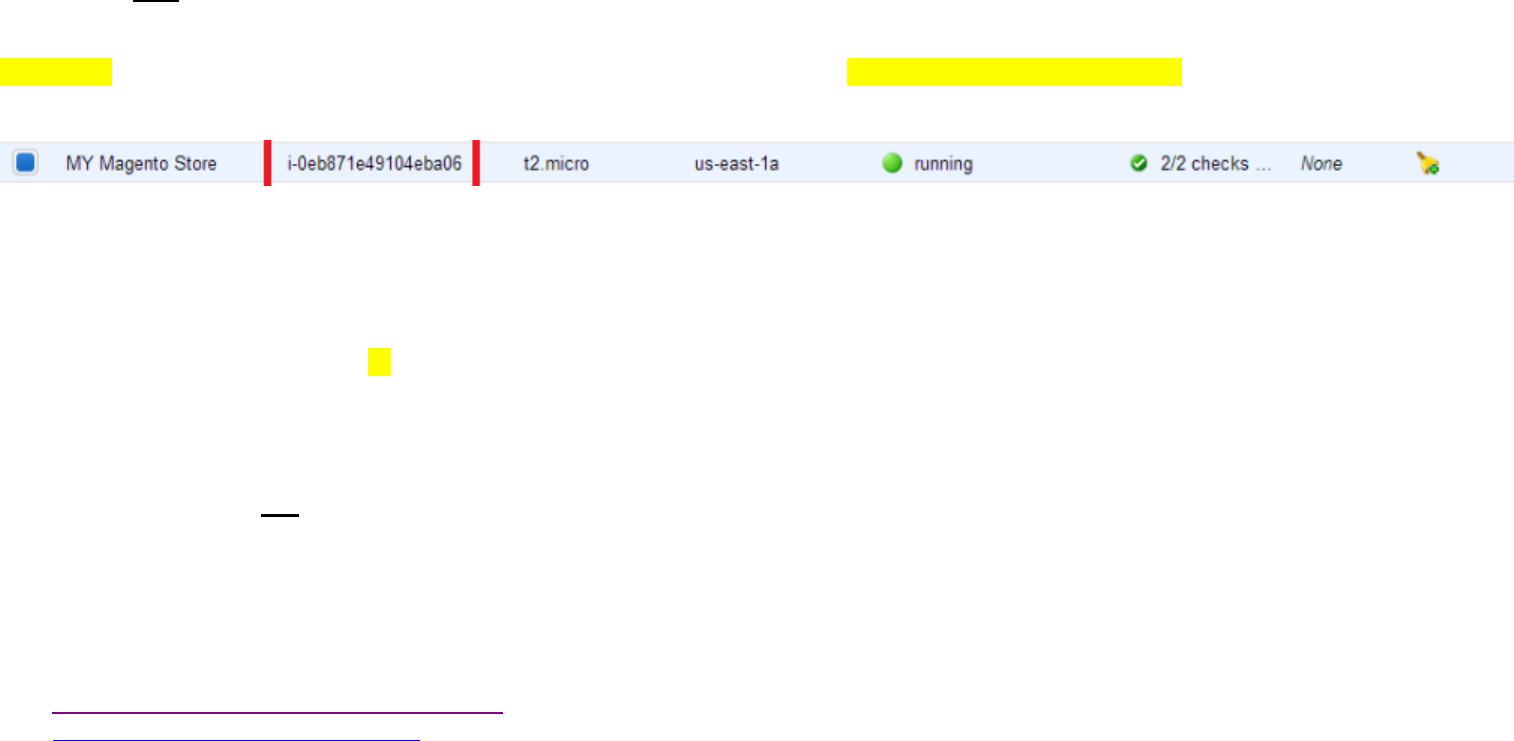
Password = your AWS Instance ID
Password is your EC2 Instance ID. From AWS Web Console, or obtain via CLI: ~$ ec2metadata --instance-id
Example from AWS console:
IMPORTANT! Please store this password in a safe location as you may later change EC2 instance IDs, and forget your password.
Note: You would also use these very same credentials to access the database through phpMyadmin.
https://Your_AWS_Public_IP_or_Hostname:8080/phpmyadmin/
NOTE: Make sure you include the “/” at the end of the phpmyadmin URL.
X. Email Configuration
Postfix is installed but is not configured!
It is advised should you use our stack for WordPress, Magento, or other CMS, using an SMTP plugin that makes life a lot better and
a lot easier to configure. ;-)
However, postfix allows the server to send mail in default configuration. E.g. password reset email.
Ref. https://help.ubuntu.com/community/Postfix
Ref: https://aws.amazon.com/workmail/
WordPress 4.9.9 - F1 - G3 Document Version 2.0 Copyright © 2019 White Square Media, Inc. All Rights Reserved.
Page 20 of 38
XI. WordPress Install 4.9.x [Part I]
With DNS configured and an SSL certificate assigned it is time to proceed with the WordPress setup.
http{s}://subdomain.example.com or http{s}://example.com
http{s}://<youripaddressordomain>/wp-admin/install.php
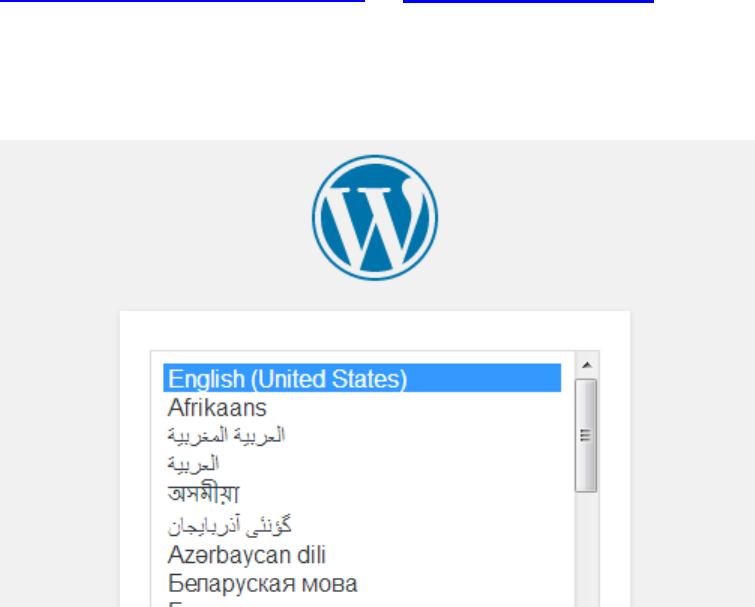
>>Select your language.
WordPress 4.9.9 - F1 - G3 Document Version 2.0 Copyright © 2019 White Square Media, Inc. All Rights Reserved.
Page 21 of 38
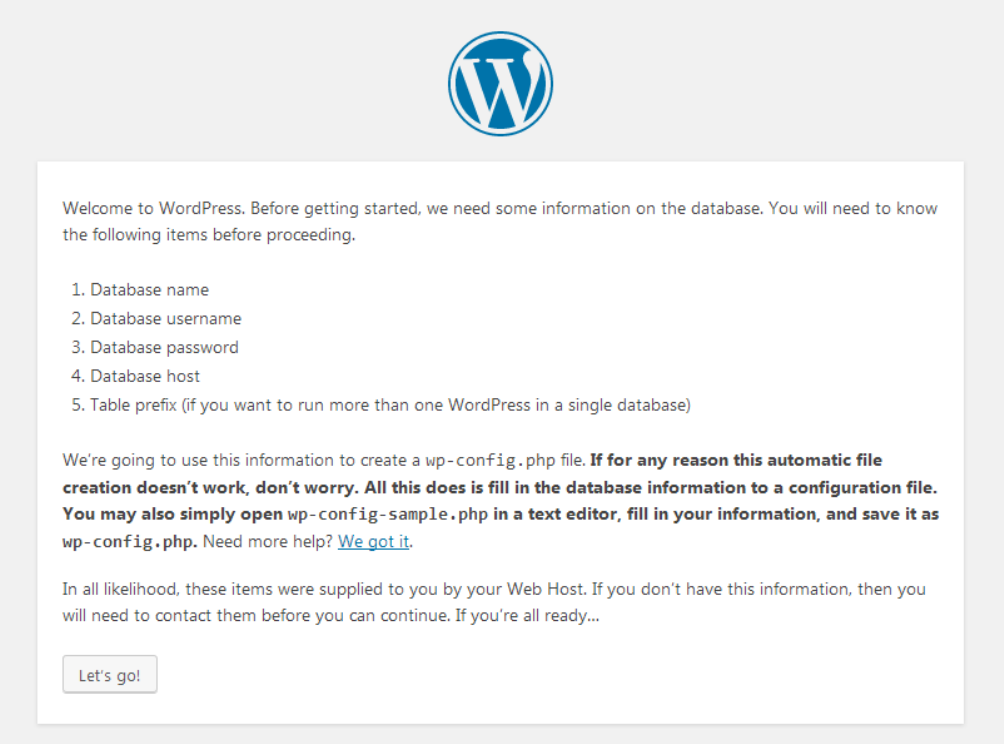
>> Review and then Select “Let’s Go”
WordPress 4.9.9 - F1 - G3 Document Version 2.0 Copyright © 2019 White Square Media, Inc. All Rights Reserved.
Page 22 of 38
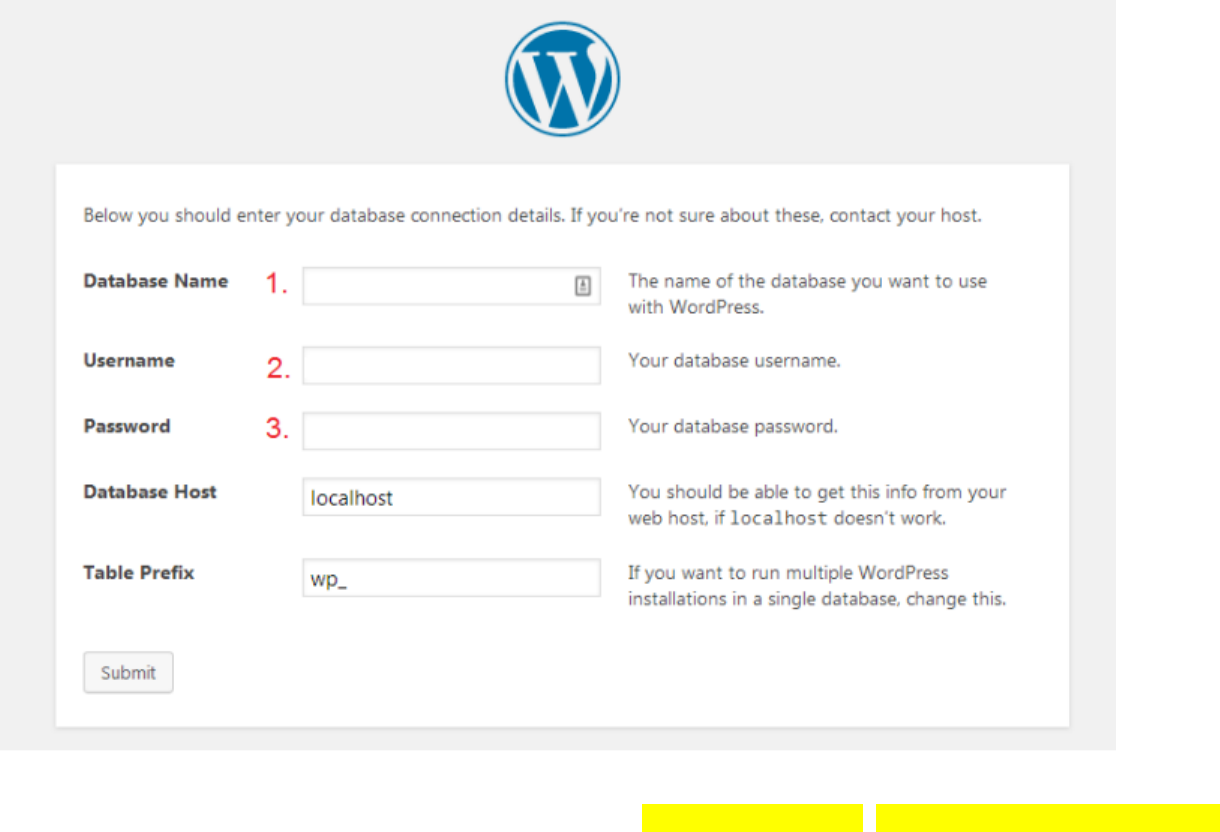
Fill in the database information.
User: root ; Password: {EC2 Instance ID} ; Database: wordpress
>>Click “Submit” when finished.
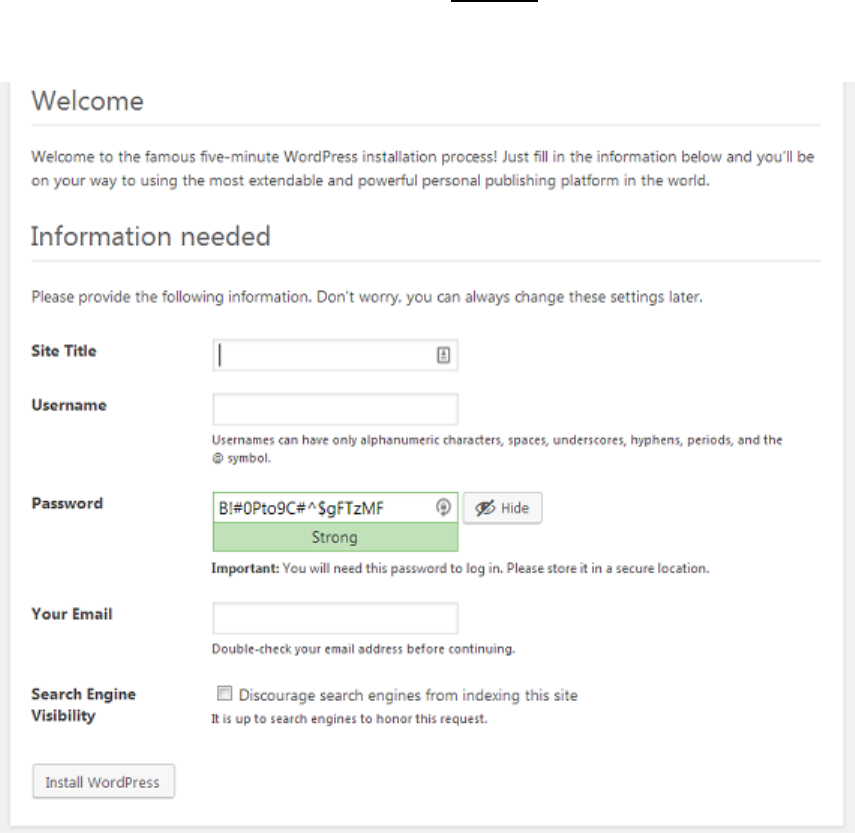
Enter Site Title, Create your WP Site Admin Username, and Copy the password. Enter your Real email address.
WordPress 4.9.9 - F1 - G3 Document Version 2.0 Copyright © 2019 White Square Media, Inc. All Rights Reserved.
Page 23 of 38
Note: This is your WordPress Admin, and different from your MySQL admin. Do not use the same information for both.
>>Select “Install WordPress”
WordPress 4.9.9 - F1 - G3 Document Version 2.0 Copyright © 2019 White Square Media, Inc. All Rights Reserved.
Page 24 of 38
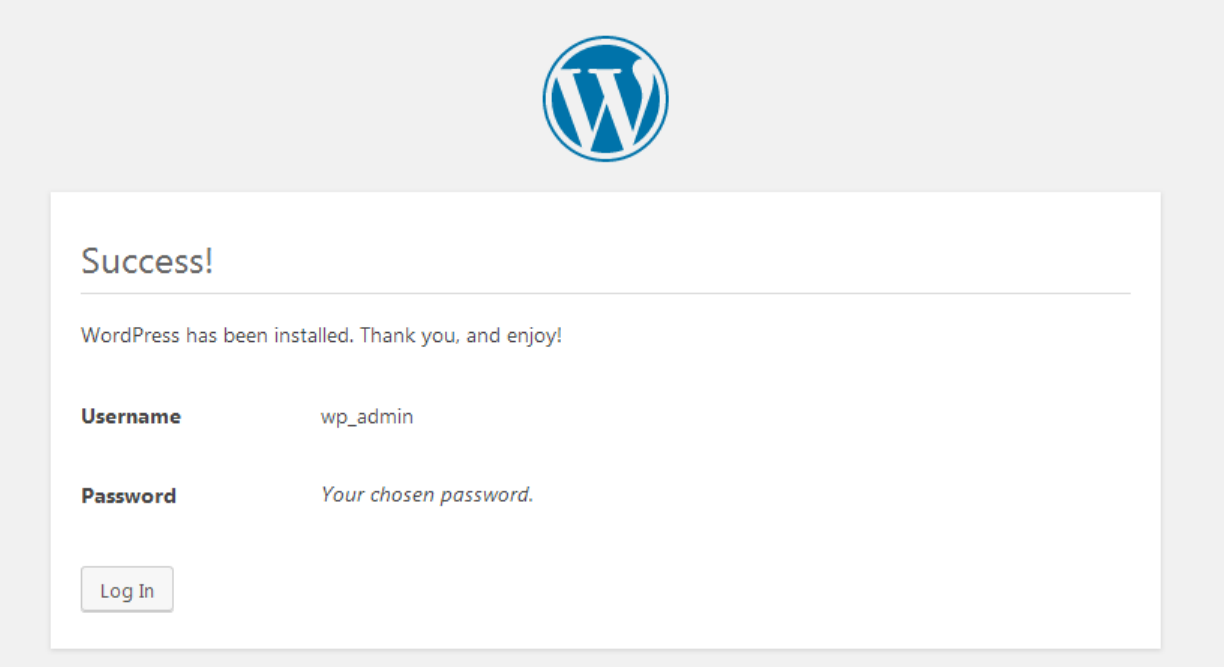
You’re finished! Yay :)
>>Click “login” to configure your WordPress site. To access the Admin Panel: http{s}://<youripaddressordomain>/wp-login

WordPress 4.9.9 - F1 - G3 Document Version 2.0 Copyright © 2019 White Square Media, Inc. All Rights Reserved.
Page 25 of 38
Your new site welcome screen with default WordPress theme:
http{s}//yourdomain_or_ipaddress
WordPress 4.9.9 - F1 - G3 Document Version 2.0 Copyright © 2019 White Square Media, Inc. All Rights Reserved.
Page 26 of 38
XII. WooCommerce Plugin 3.5.3 [Activate & Configure]
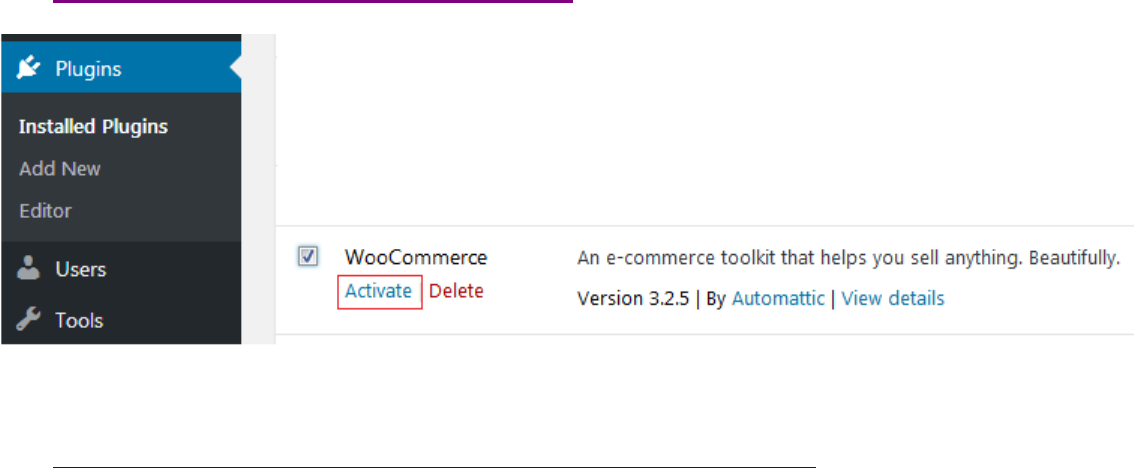
1. Log into WP-Admin Panel
2. Navigate to Plug-ins in WP Main Menu
>>Activate WooCommerce
Ref: https://wordpress.org/plugins/woocommerce/
Note: Please review the WooCommerce configuration guide.
Ref: https://docs.woocommerce.com/document/woocommerce-setup-wizard/

WordPress 4.9.9 - F1 - G3 Document Version 2.0 Copyright © 2019 White Square Media, Inc. All Rights Reserved.
Page 27 of 38
XIII. Post Install - WordPress Upgrade Options
Note: Before you upgrade, you may want to consider making an AWS EC2 backup image of your completed stack so you do not
have to go through the build process again should you encounter an issue with an upgrade.
Important: Before you upgrade, check any plugins that in use for compatibility with your new version. Same goes for any custom
theme you may be using.
1. From within the WordPress dashboard select upgrade to 4.9.x
2. After upgrading WordPress, you may want to also upgrade any plugins to their latest supported version.

WordPress 4.9.9 - F1 - G3 Document Version 2.0 Copyright © 2019 White Square Media, Inc. All Rights Reserved.
Page 28 of 38
XIV. Performance Tuning; Part I - It’s All about the Cache
As you know, this stack is designed for speed! This F1 stack can score high 90’s from Pingdom, GTMetrix, and Google Insights
using the default WordPress and/or WooCommerce Storefront theme.
As shown here in the demo: https://woo.awsamistacx.com/
However, you need to understand that you are caching objects to client browsers, and if you use CloudFront or CloudFlare, you
have to understand you are caching and understand headers. aMiSTACX has pre-configured the vhost for 80 and 443 to use the
cache-control header with max age. Adjust as required.
Note: Headers Module is now enabled by default. Should you no longer want to use the module for any reason, you will need to
disable the module.
IMPORTANT! If you use CloudFlare CDN, please do A/B testing. We have observed instances where the CDN was slowing down
the performance of our stacks.
Note: Turning off Rocket Loader™ may increase quality scores on some speed test sites - such as worldpagetest.org
You still can use CloudFlare for basic DNS, but you will need to set your domain to “grey” cloud, meaning CDN off. When toggling
CF On and Off, please wait at least 5-10 minutes between testing cycles.
WordPress 4.9.9 - F1 - G3 Document Version 2.0 Copyright © 2019 White Square Media, Inc. All Rights Reserved.
Page 29 of 38
Part II - Google PageSpeed for Apache [Optional]
The Google PageSpeed module is installed and disabled by default as it actually may slow the server. Caching is beyond the scope
of this guide and is up to the customer to implement correctly. Components are only provided as a convenience.
/etc/apache2/mods-available/pagespeed.conf
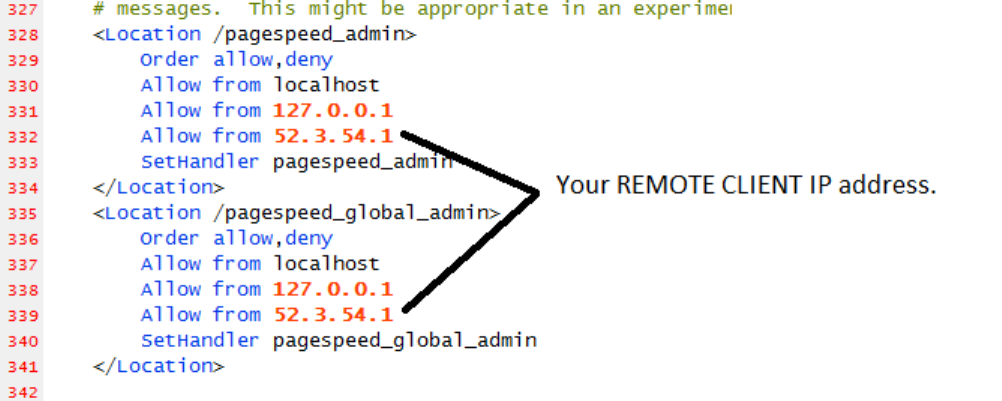
You have the option to turn On the PageSpeed module [Line 4], and you can also set the remote access to the admin panel.
To access remote access panel:
Step 1. Add these lines and add your client IP address.
WordPress 4.9.9 - F1 - G3 Document Version 2.0 Copyright © 2019 White Square Media, Inc. All Rights Reserved.
Page 30 of 38
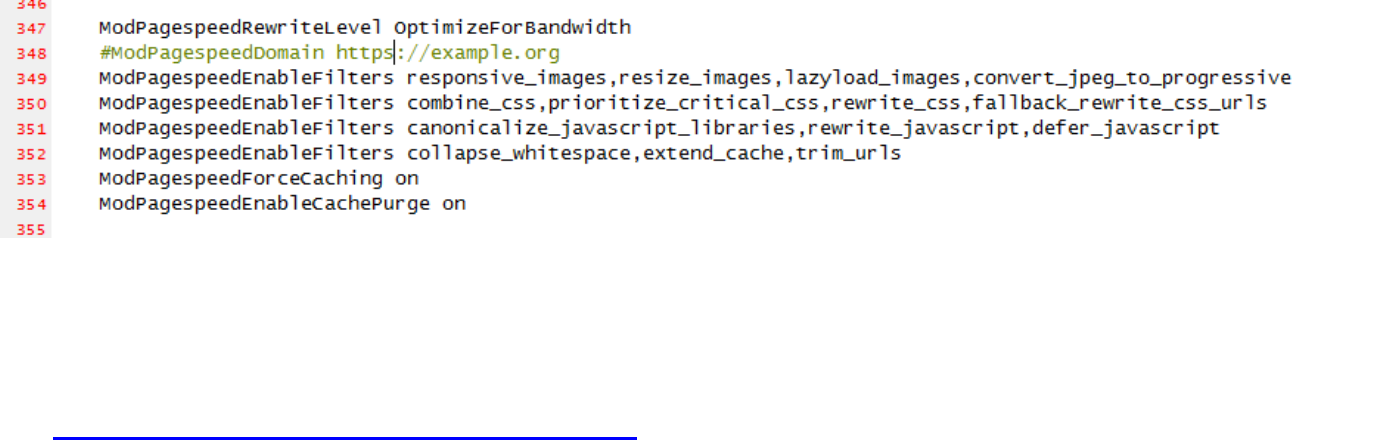
Step 2. Uncomment line 348 and add your domain or IP address.
Step 3. Restart Apache and to access then from a browser:
e.g http://{Your_AWS_IP_Hostname}/pagespeed_admin
Ref: https://www.modpagespeed.com/doc/configuration
WordPress 4.9.9 - F1 - G3 Document Version 2.0 Copyright © 2019 White Square Media, Inc. All Rights Reserved.
Page 31 of 38
Part III - aMiSTACX PageSpeed WordPress Purge Module [Optional]
The aMiSTACX PageSpeed & Redis Purge Plugin module is installed and disabled by default.
To make use of this plugin PageSpeed need to be properly configured!
To access remote access panel:
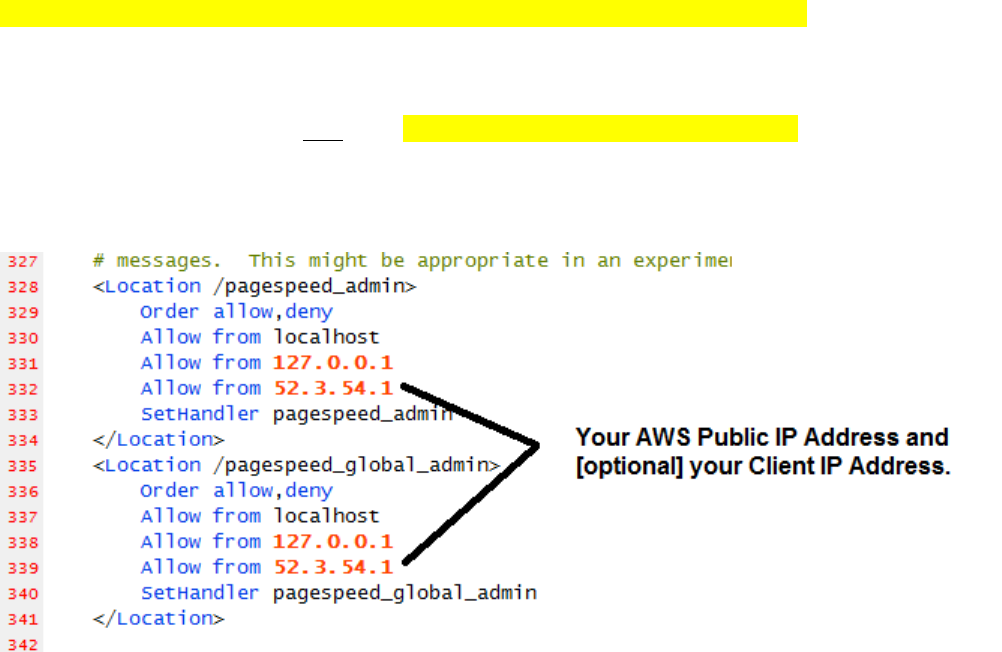
Step 1. Add these lines and add your AWS Public EC2 server IP address, and as an option your client IP address.
/etc/apache2/mods-available/pagespeed.conf

WordPress 4.9.9 - F1 - G3 Document Version 2.0 Copyright © 2019 White Square Media, Inc. All Rights Reserved.
Page 32 of 38
Step 2. Uncomment line 348 and add your domain or IP address.
Note: If you use HTTPS, then the hostname needs to match the server certificate. If not you will get a cURL warning when purging
the PageSpeed cache using the plugin.
Step 3. Restart Apache
sudo service apache2 restart
Step 4. Edit your WordPress .htaccess file and configure like this:
[Assuming Fresh install.]
# BEGIN WordPress
<IfModule mod_rewrite.c>
RewriteEngine On
RewriteBase /
RewriteRule ^index\.php$ - [L]
RewriteCond %{REQUEST_URI} !pagespeed
RewriteCond %{REQUEST_FILENAME} !-f
RewriteCond %{REQUEST_FILENAME} !-d
RewriteRule . /index.php [L]
</IfModule>
# END WordPress

WordPress 4.9.9 - F1 - G3 Document Version 2.0 Copyright © 2019 White Square Media, Inc. All Rights Reserved.
Page 33 of 38
Step 5. [Optional] Assuming you added client IP address in step 1. Access PageSpeed Admin Panel then from a browser:
e.g http://{Your_AWS_IP_Hostname}/pagespeed_admin
Ref: https://www.modpagespeed.com/doc/configuration
WordPress 4.9.9 - F1 - G3 Document Version 2.0 Copyright © 2019 White Square Media, Inc. All Rights Reserved.
Page 34 of 38
XV. How to switch PHP versions [Example]
[Applies to 7.0 -7.3]
To Switch to php 7.0 from php 7.1:
- Disable FPM Service for PHP 7.1
sudo service php7.1-fpm stop
- Since we want 7.0 as the default, Disable 7.1 FPM Service on Startup
sudo systemctl disable php7.1-fpm
- Double-Check, but these should already be Disabled
sudo a2dismod php7.2
sudo a2dismod php7.1
sudo a2dismod php7.0
- Verify Apache Config for 7.0 is Active One
sudo a2disconf php7.1-fpm.conf
sudo service apache2 restart
sudo a2enconf php7.0-fpm.conf
sudo service apache2 restart
- Restart PHP 7.0 FPM Service and Enable on Startup
sudo systemctl enable php7.0-fpm
sudo service php7.0-fpm restart
sudo service apache2 restart
sudo update-alternatives --set php /usr/bin/php7.0
- Verify PHP 7.0 with Opcache
php -version
- Double-Checking Services Running
systemctl status php7.0-fpm
systemctl status apache2

WordPress 4.9.9 - F1 - G3 Document Version 2.0 Copyright © 2019 White Square Media, Inc. All Rights Reserved.
Page 35 of 38
XVI. What’s Next?
Be sure to checkout our WordPress and main site for tips and assistance.
https://amistacx.com/wordpress/
https://amistacx.com
Register for Area 51 Management Dashboard
Create a FULL AMI Image/Snapshot backup
Consider updating the Ubuntu System Files and add the latest Security patches.
Note: Make a full backup first!
From CLI
sudo apt-get update
sudo apt upgrade
sudo apt autoremove

WordPress 4.9.9 - F1 - G3 Document Version 2.0 Copyright © 2019 White Square Media, Inc. All Rights Reserved.
Page 36 of 38
XVII. Post Install Security
1. Lock-down https://<yourdomain>:8080/phpmyadmin
For a production environment, it is strongly suggested you implement a second level of security on the phpMyadmin URL by using
AWS Security Group IP policies to restrict access.
2. SSH Security Group
Consider restricting access to the SSH port via your AWS security group. As per the below article outlines.
https://amistacx.com/restrict-access-to-ssh-with-aws-security-groups/
3. Two-Factor Authentication [Activate]
We have pre-loaded a two-factor authentication plugin. You may want to consider activating it for additional security to the
WordPress Admin console. Please review the plugin’s documentation prior to activation.
Tip: If you need to reset your group/user permissions and folder/file permissions back to the aMiSTACX default:
sudo chmod -R u+rwX,go+rX,go-w /var/www/wordpress
sudo chown -R www-data:www-data /var/www/wordpress
WordPress 4.9.9 - F1 - G3 Document Version 2.0 Copyright © 2019 White Square Media, Inc. All Rights Reserved.
Page 37 of 38
XVIII. Area 51 aka A51 Dashboards [Registration]
A51 dashboards will allow a centralized external management of aMiSTACX resources on AWS. You must have aMiSTACX EC2
servers in order to make use of the A51 dashboard product.
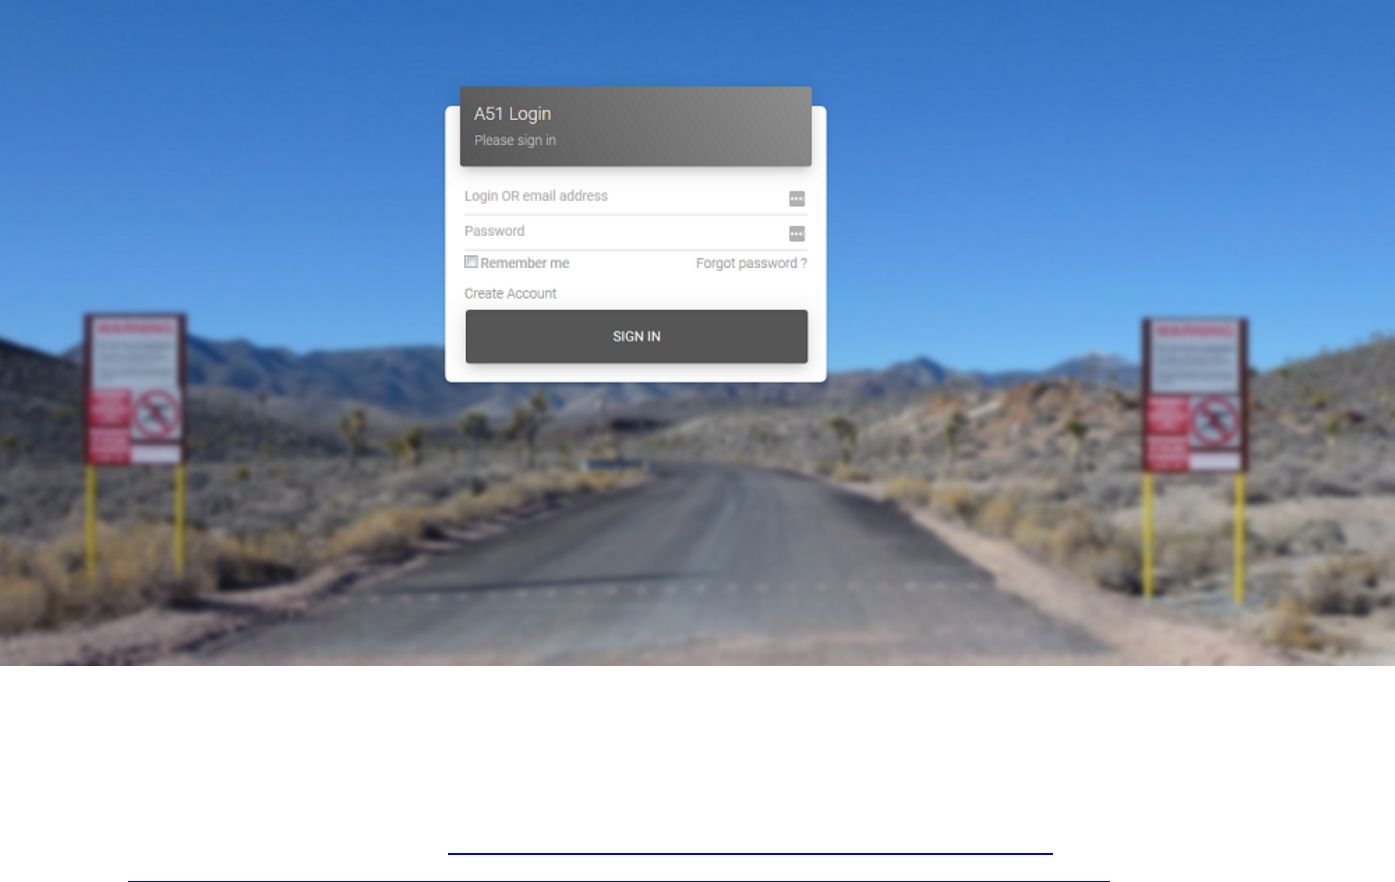
Simply click “Create Account” from the login screen and follow the onscreen prompts.
More details and updates can be found at https://amistacx.com/area-51-aws-management-console/
A51 Guide: https://s3.amazonaws.com/amistacx.com/mp/stacx_a51/A51-dashboards-documentation.pdf
WordPress 4.9.9 - F1 - G3 Document Version 2.0 Copyright © 2019 White Square Media, Inc. All Rights Reserved.
Page 38 of 38
XIX. Support
Should you need help or have questions, please reach out to support. We will do our best to respond within 24hrs, and if you can’t
wait you can try our AI Macey-Bot. She’s available 24/7/365, and she’s good :)
Home & KB: https://amistacx.com
Thanks for selecting aMiSTACX as your Premium AWS EC2 stack provider. Better - Stronger - Faster!